Showing posts with label tutorial. Show all posts

November 19, 2016

Pumpkin Pie Spice - Recipe

Tis the season for Pumpkin Pie Spice everything! You can use this for all your holiday desserts, drinks, or if you're like me you're adding it into your pancake mix as well. So here's my simple recipe on how you can make your own pumpkin pie spice. I used spices by McCormick (I recommend their organic line if it's available in the spice you want), and where it reads "part/s" you can use whatever measuring size you want (I went with tablespoons for mine). I also found that some other pumpkin pie spices may have additional things added to their spice such as ground clove, mace, sweet orange peel, brown sugar, or even cardamom.

Ingredients

2 Parts - Cinnamon, ground (I love ground Saigon Cinnamon for this)
1 Part - Ginger, ground (I used ground Chinese Ginger)
1 Part - Nutmeg, ground
1 Part - Allspice, ground

Combine ingredients into a spice jar (or similar). Close jar with a lid and shake vigorously until well combined.

 Now you're ready to sprinkle your Pumpkin Pie Spice on whatever food your heart desires!

August 28, 2016

Eliminate Gossip and Slander - Spell

I have recently developed a new interest in something a bit... magical we'll say. On Pinterest I have started saving a lot of pins on witchcraft. Of course, I do feel skeptical that any of this stuff really works but figured... why not have some fun and see what all the hocus pocus is about.

Items
I made a trip to Target to achieve my first Pinterest spell.. and while this spell may be a bit hard to prove if it really worked or not I figured... what harm could it do? The reason I chose to do this spell was because I have been dealing with friends of a past love interest who I feel have been very gossipy and overly involved in this past relationship. I figured the best and fastest way to go about this spell is to buy a red candle that is tealight size so, I happened to find these red tealight candles (which are apple cinnamon scented..not sure that matters for this) on clearance while at Target and a pack (12) of them cost $2.28, while a small container of whole Cloves at Target cost $5.19.
Click Image to Enlarge
My how to
I chose to use 3 cloves for this (because.. the power of 3, IDK) and placed them on top my single red tealight candle. Since there are no words for this spell I felt it best that the person who is being gossiped about should be the one who lights this candle. Once lit, do not blow out the candle, allow it to burn until it goes out naturally (this is why I suggest using a small tealight candle). Be sure you do monitor your candle because if the cloves catch fire and go crazy.. you'll have a problem. However, my cloves didn't catch fire and they just sank down into the wax as the candle melted down. I also chose to set my candle on top a small round mirror to hopefully increase the spell's effects with the power of reflection (yea again, IDK.. my mentality for ya), while also keeping things a bit on the safer side as well. It may also help the spell along if you think of those that you know have been gossiping about you as you light your red cloven candle.

My Results
I'm not sure if this worked to eliminate gossip, but it may cause you to be the one doing the gossiping instead.

March 29, 2016

Patacones - Recipe

While in Panama earlier this year I came across a simple side dish known as Patacones, and my boyfriend whom is Panamanian was able to teach me how to make them.
First of all, you do want green plantains or ones where the peel isn't mostly black in color. If you peel the plantain and the inside has a peachy tint to it rather than a white-yellow color than it is probably too ripe in which case the patacone will be on the mushy side, where as it should be a bit hard and crisp after cooking. My boyfriend recommends using vegetable oil with this recipe, and I like using it with this because it seems to give the patacones a nice buttery flavor. I also like to heavily salt the plantains before cooking because in my opinion it tastes less bland and more appetizing, although in Panama it tends to be more on the bland side but to each their own.

Plantains, green
Vegtable Oil
Salt

Cut the ends off the plantain. Cut down into the peel along the center (long ways) of the outer curve of the plantain. Use your fingers to peel back and remove the peel from the plantain (it can be a bit hard but don't be discouraged). Slice the plantain into about 3/4-inch thick cuts. Liberally season the plantain slices on both cut sides with salt according to taste.

Add about a 1/2 inch of the oil in a small pan and heat the oil on a medium-high heat setting. Once the oil is heated place the plantain slices in the pan on the flat cut side of the plantain (you should hear it sizzle when placed into the hot oil). After about 3 minutes flip the slices over and continue cooking another 3 minutes. Remove the slices from the oil and press the slices flat (you can use the bottom of a flat glass/cup, or a tool made for pressing patacones) til they're about a 1/2 inch thick. Once they're all pressed place the flattened plantains back into the hot oil to cook 3 minutes or until golden (you do not need to flip them over). Set the patacones on a paper towel to remove excess oil. These are best served hot.

March 02, 2016

How to Disguise a Deep-set Under Eye Area

If you have deep-set eyes chances are it can start to age you in a way, or maybe you just find it a bit unappealing. Whatever the reason may be having deep-set eyes myself I found what I feel is the best and easiest 2-step way to try and disguise my deep-set under eye area. There is no way to change the natural structure of your face (without perhaps the help of surgery) so you will still have some shadowing from the natural structure of your face and this can not be avoided, but this tutorial helps to reduce a deep-set eye appearance with the help of makeup.

Also, if you find you're not getting enough coverage from these two products try to use a full liquid foundation either before or after you do Step 1. I prefer applying a tinted moisturizer followed by my liquid foundation, and then starting with Step 1 - Concealer and finishing with Step 2 all over my face. If you have oily skin than you may want to try using a matte finish face primer after you moisturize. I also recommend not using a liquid foundation that contains fine shimmer or SPF as these things can reflect light off the face and not help in reducing the appearance of a deep-set under eye area. 

If you're someone that desires a dewy complexion I recommend using a highlight powder. I would suggest not applying any highlight near the top of your cheek bones but rather along the temples. You can still highlight the bridge of your nose, cupids bow, eyes, etc. just avoid the cheek and under eye area.

Here you can see how the light reflected off my deep-set under eye area before and after I did my makeup.

Step 1 - Concealer
Use a full-coverage liquid concealer similar in color to your skin-tone, or a shade lighter. Dab a few drops along the line of your under-eye crease. Using a dry beauty blender (your finger will also work) dab and blend the concealer under the eye up toward the lid and down along the side of your nose blending it on your face to make a triangular shape. Repeat on your other eye.

By expanding the color beyond the crease it helps to even out where natural light tends to hit and reflect off your face. Applying a concealer helps to even out the eye area, as often a deep-set eye can create a shadow-like effect making you appear to have dark circles.

I recommend It Cosmetics, Bye Bye Under Eye which is a full coverage waterproof concealer (I use the color Neutral Medium).

Step 2 - Matte Powder
Using a matte powder and a kabuki brush (your finger will also work) press the powder on top of the concealer you just blended on (you can choose to use this powder all over your face as well once your foundation is done).

The matte powder will help cut down on how the light reflects off of your face, thus reducing the appearance of a deep-set under eye area.

I recommend Rimmel, Stay Matte which is a long lasting matte pressed powder (I use the color 004 Sandstorm).

February 01, 2016

Vanilla Foot Moisturizer - DIY

Lately I have been trying to find ways to moisturize my feet since my toenails have seen better days. I found a few oils that have appeared to work great for things like dry toenails and feet so, I decided to create my own foot moisturizer. I apply this mixture to my feet at night before bed and I put on some thin cotton socks (cotton allows feet to still breathe) to help keep the moisturizer from rubbing off on my sheets and hold in the moisture. When I take off my socks in the morning my feet and nails look much more moisturized and have begun to heal more with each use. You can use this mixture regularly or as needed, and can adjust this recipe to your liking.

Did you know.. 
Oiling your feet can help improve mood and alleviate illness?


Ingredients
1 SMALL - Jar with Lid (or similar)
3/4 CUP - Coconut Oil (solid form)
1/2 TBSP - Sweet Almond Oil
1/2 TBSP - Jojoba Oil
1/2 TBSP - Imitation Vanilla Extract (or similar)

Melt the solid coconut oil in the jar (without lid) for about 30 seconds in microwave (once it starts melting you can remove from heat and stir until it dissolves completely). Combine the other ingredients into the jar, close lid, and shake vigorously until the mixture is well blended. Loosen the lid to the jar a bit and allow the mixture to cool in fridge for about an hour (or until the coconut oil becomes solid again). Remove from fridge, apply mixture to clean feet and toenails, and put on some thin cotton socks to help keep feet moisturized through the night.

You should not have to put the mixture back into the fridge again once it's a solid as it should remain a solid at room temperature. As the mixture warms in your hand it should turn to liquid/oil form making it easy to apply evenly onto your feet.

March 26, 2015

What Order to Apply Makeup

You can apply your makeup however you like but for myself I do feel there is an order in which makeup should get applied onto the face. Now if there is a certain area of the face in which you perhaps don't feel like adding makeup to then you can omit those things from my 10 step order and continue on to the next makeup step listed on here.

Facial Moisturizer
The first makeup item I like to add to the face is moisturizer. By applying moisturizer first it allows the face to get hydrated which helps to plump the face by circulating the blood as you massage the moisturizer into the skin. This also can help reduce redness, reduce signs of aging from the sun (especially if your moisturizer has an spf), fill in skin, and help with dry skin. The other reason I do this first is because it gives me a slightly moist base to work with for the next makeup item I going to apply...

Brows
I like to use a brow powder to do my brows (you can use whatever you like) and since my skin is slightly moist from the moisturizer that gives the powder a better adherence to skin, especially if your brows may be a bit sparse. The other reason I do this is to better clean up under my brows with the next makeup item I am going to apply...

Eye Makeup
I do my eye makeup after my brows because this allows me to clean up under my brows with a nude eye shadow (or color of choosing). Here is also where you can choose to prime your eyelid and apply any eye shadow/s at this time. The other reason I do this when I do is to clean up any possible eye shadow 'fall out' with the next makeup item I am going to apply...

Liquid/Cream Foundation and Concealer
I start by wiping off any eye shadow 'fall out' with a tissue or makeup wipe, by doing this it keeps any other colored makeup from accidentally getting mixed into the foundation I am about to apply. You can start your foundation by first applying a face primer. Next apply a concealer to help eliminate any imperfections (like acne scars). Next apply a liquid or cream foundation. You can also use the concealer again as a highlighter on the face if it is a bit lighter shade than the liquid/cream foundation just applied.

Bronzer and/or Contour
Since contouring is part of skin coloration/correction much like foundation I like to apply it before blush. Contouring or Bronzing is generally in cream or powder form and to get the most bang for your buck it will adhere better on top of the previous foundation applied.

Blush
By applying blush after contour or bronzing you are allowing the color of the blush to speak for itself on top parts of the contour rather than having it get muddled down by it. It will also offer more color on top the liquid foundation and/or moisturizer and may reduce how much blush you will need to use otherwise.

Face Powder
Applying face powder after bronzer or blush allows you to tone down and clean up any harsh lines or strong coloring that may have occurred and in the long run doing this after saves on having to use more powder than you might have used if you did this before the two. Face powder also helps to set and soften any liquid makeup applied before hand. I also like to apply a bit of shimmery powder on-top the face powder to add highlight to certain areas of the face.

Facial Mist
This is best applied after all face powders have been placed onto the face to give an all over dewy finish to the skin. Applying it now also reduces mascara from running onto the skin later. Allow facial mist to dry before moving on to the next steps.

Eye and Lip Liner
Lining eyes and lips now keeps any powdered products from muddling down liquid or gel eyeliner, and any previous powder that may have gotten onto the lips can help in providing a base for lip liner.

Mascara and Lips
The last step is to apply mascara to curled lashes and adhere any false lashes. Complete lined lips with lipstick and/or gloss to finish off the lips.

March 22, 2015

Organically Clean Makeup Brushes

To clean my makeup brushes without any harsh chemicals I use Dr. Bronner's unscented baby-mild pure liquid castile soap which basically consists of a combination of organic based oils. I pour some of the soap onto the brush while running the brush under the faucet and swirl the brush in circular motions against the palm of my hand (you can use a bowl if you prefer) and I repeat this process until the brush is clean of makeup residue. I then rinse the brush in a circular motion under warm/hot water, repeating until all the bristles on the brush is free of any soap. I then dry the brush in a circular motion on a clean dry towel until the bristles are mostly dry. Next I stuff a paper towel into the base of a drinking glass and store the clean brushes upside down in the glass. Then I leave the brushes to dry overnight so that any excess water gets drawn out of the ferule and onto the paper towel (if you have brush guards you can use those to help keep the form of the bristles while the brush dries). If the brush is still wet in the morning than blow some heat on it with a hairdryer for a minute or so, and avoid heating the ferule.

December 28, 2014

Basic Kylie Jenner Inspired Makeup Look

I wanted to create a quick and basic way to recreate Kylie Jenner's makeup look and this look mainly consists of 3 main things... full medium/dark brows, a full nude-mauve pout, and dolly looking lashes. This was a very successful first date makeup look for myself and I kind of felt it had a natural "dark angel" feel to it.

Brows
For the brows I used Prestige brow shaping studio in Light to Medium (Medium Shade) on a small thin angle brush. Next time I do this look I will probably add a bit of Benefit's Gimme Brow in Light/Medium over top just to keep my blonde brows from peeping through in the light.

Lashes
For the lashes I curled them at the base with the Revlon eyelash curler and used Rimmel London ScandalEyes lycra flex mascara in black (2-3 coats on the top lashes and 1 light coat on the bottom). If you want to have fuller lashes more like Kylie's I'd recommend adding on Red Cherry false lashes in #16, black.

Lips
For the lips I used Revlon ColorStay liner in Natural and topped my lips off with Rimmel lasting finish by Kate Moss lipstick in 101, but if you want something a bit darker I'd recommend 104.

As for any other makeup items used here... 
Aveeno clear complexion bb cream spf 30 in medium, Revlon colorstay liquid foundation in Buff, Maybelline instant age rewind eraser dark spot concealer + treatment in Fair, Rimmel stay matte pressed powder in creamy natural, Physicians Formula shimmer strips custom all-in-1 nude palette for face and eyes in natural (my face and eye highlight shade), Sonia Kashuk blush in Flamingo, Innisfree green tea mineral mist, and Loreal True Match super blendable powder in Honey Beige/N6 (my contour and eye shadow shade).

June 01, 2014

Sleeping Beauty Inspired Makeup Look

This week I'm going to see Maleficent and I wanted to try and recreate Aurora's AKA Sleeping Beauty's makeup look. I know the blush in my photo looks less intense than the image but that's only because of the iphone and instagram filters I used, it was actually a pretty good match. If anything I didn't feel my foundation colors were a good match as it needed to be lighter with more pink undertones, but the filter helped a bit. I would also use a bit of shimmer powder on the T-Zone next time I did this look as well. I did feel several of the products I used were a bit optional really, hence saving you some cash ;)
Maleficent (movie)
Products Used...
Face Moisturizer: Ponds rejuveness
Foundation: Revlon colorstay liquid foundation dry/normal in Ivory
Concealer: Maybelline instant age rewind erase dark spot corrector + treatment in Fair
Powder: Rimmel matte pressed powder in Creamy Natural
Blush: Barry M blusher in Apricot
Eye Primer (optional): NYX eyeshadow base in Nude
Contour (face and lids): e.l.f. studio blush and bronzing powder (bronze shade only)
Eyeshadow Highlight (optional): Urban Decay naked 2 eyeshadow palette in Foxy
Brows: Prestige brow perfection in Medium
Top Lashes (one coat, but optional): NYC big bold mascara in Black
Lips: Maybelline lipstick in Magnificent Mauve
Lip Gloss (optional): Almay lip balm in Rosy Lipped
iPhone filter used was "Faded" +
Instagram filter used was "Walden"

July 10, 2013

Watercolor Nails

This past week I created these cute and colorful watercolor-esque nails. Here's a LINK on how you can achieve this look. I of course added in my own personal touch with a hint of gold using a Stripe Rite nail art brush in gold glitter. I was originally hoping I had a chunky gold glitter polish to add to this nail look rather than the nail art brush, but I only had a silver one... I'll be on the lookout for one though (perhaps Milani in Gold)!
Base polish: Wet N Wild in French Creme White
Other polish colors used: China Glaze in Flip Flop Fantasy, Yellow Polka Dot Bikini, and Secret Peri-Winkle.

February 07, 2013

Nolita Nails - Tutorial

The other day I posted on my FB that next week consisted of 3 holidays... Chinese New Year, Mardi Gra, and Valentine's Day. So I asked everyone what type of nail design should I do and received several mash-up type ideas... but I honestly still wanted something a bit trendier rather than traditional. It wasn't until I came across a new clothing line coming out for Target on Chinese New Year that I found my holiday trio inspo. The new line is by Prabal Gurung and the theme happens to be about "love" so... there's my v-day part. The colors consist of mardi gra's infamous purple, yellow, and green shades (which the overall look does remind me just how festive mardi gra is!), and the Chinese part... well Mr. Gurung is Asian and of course its release date is on Chinese New Year so... I present these simple Nolita style nails.
Step 1: Apply a clear base coat (optional).
Step 2: Apply a base color in either yellow or white.
Step 3: Using several different colored nail art stripers haphazardly make 2-3 overlapping lines in each color going from the base to the tip of the nail.
Step 4: Apply a clear top. Let dry completely.

Side Note: If you don't have a bunch of nail art stripers or don't trust yourself with a nail art brush than try picking up a pack of BiC markers to draw on some lines instead, but I'd recommend using a white polish as a base color since the BiC markers are a bit transparent.

July 22, 2012

Infinite Spoiled Brat Makeup

Eyes
Prime Lids: NYX eye-base in White
Brow Bone & Lower Lid: Wet N Wild eyeshadow in Brulee
Highlight: NYX eyeshadow in White
Lid & Cat-Eye: Wet N Wild's 'Spoiled Brat' palette in Eyelid (shimmery silver color)
Top Lid Liner: Milani liquid eyeliner in Infinite
Top Lashes: Maybelline MegaPlush mascara in Very Black (Apply 3 quick coats)

*Use a strip of 1-in masking tape along the outside of your eye to help make a clean and sharp cat-eye line, then remove the tape gently once you've applied your eyeshadow.

Face
Moisturizer: Olay touch of foundation
Liquid Foundation:
Maybelline 24hr stay in Sand Beige
Powder: Revlon pressed powder in Light

Lips
Prep: Aquaphor Lip Ointment
Lip Gloss: Revlon lip gloss in Peach Petal
Lipstick: A dab of CoverGirl lipstick in Sultry

Brows
Define: Wet N Wild brow pencil in Taupe
Fill: Prestige brow perfection in light to medium in Medium

Contour, Blush, and Highlight

Contour: Milani multitasking face powder in Tan
Blush: Barry M blusher in Strawberry Whip
Highlight: CoverGirl blush in Shimmering Sands

June 25, 2012

Bronzed Face for Fair Skin

I noticed that a lot of people have questions about bronzer and application so this post is just to give you my advice on applying it to the face and creating a nice natural tan appearance for fair skinned individuals.
For some reason I've noticed a lot of people say to apply bronzer where the sun would naturally hit your face. I find that to be horrible advice, especially for fair skinned individuals like myself that naturally sunburn and possibly freckle. However, if you want to add a light highlight shade to your face than you would want to apply that where the light would naturally hit your face. I find that applying bronzer to the contours of your face is much more appealing and doesn't give you that dirty appearance if it had been applied to where the light naturally hits. You also want to blend your contours expanding it out a bit on the areas where light doesn't naturally hit your face but focus most of it around the sides of the forehead, under the neck, along the jaw line and the sides of your nose.

Applying a blush will look more natural than just adding a tan shade to a fair complexion and it can also make for a more youthful appearance. Being fair skinned and knowing that when you get sun you probably turn a pinkish shade I like to use a very light pink blush on the apples of my cheeks and sometimes the bridge of the nose (avoid the tip of the nose so you don't look like Rudolf!) during warmer months. During winter months I'd go with a bit more intense blush shade since you will be exposed to the cooler climate and you probably won't get sunburn (unless you happen to be skiing!).

I'd also advise using a tinted moisturizer (or mix some of your liquid foundation with your face moisturizer) all over your face and neck if you're fair skinned and want to look a bit tanner or add more color to your complexion, this will help give you an all around tan appearance when followed with my bronzing advice above.

You probably don't want to neglect your eyes when going for a naturally tan look so apply an off-white matte shade (or skin tone shade) all over the lid (or a gold shade) along with an off-white shimmer shade under the brows, you can then either use the bronzer you applied to your face or a similar colored eyeshadow blended into your crease. You may also want to darken your brows slightly with an eyebrow shadow if they are blonde in color. Add some brown or black-brown mascara to your lashes and your eyes are complete (you can also line your eyes or add a bit more depth to the eye with a dark brown eyeshadow if you want to be a bit bolder).

With a nude tan face on fair complexions almost any lipstick shade will work but I'd probably avoid the pale pastel shades which can make you look too washed out, especially during summer months. For a more natural tan approach try a bronze lip color (like Rimmel's lipstick in Summer Angel).

June 14, 2012

Queen Ravenna inspired makeup look

It took me 3 attempts to see the movie Snow White and the Huntsman but just 1 attempt for me to create this Queen Ravenna inspired makeup look, enjoy ;)
EYES
Primer: e.l.f. eye primer.
Crease to under brow Highlight: Revlon eyeshadow in Vintage Lace.
Lower waterline Eyeliner: Almay eyeliner crayon in black
Upper outer half of lid eyeliner: Almay eyeliner crayon in black
Upper and Lower Lid: Coastal Scents 88 Shimmer palette in a dark copper shade.
Curl Lashes (Optional): Revlon lash curler
Mascara: CoverGirl lashblast in black-gold, 3 coats on top lashes, 1 coat on bottom lashes.

BROWS
Fill: Prestige brow perfection in light to medium, medium shade

BLUSH AND CONTOUR
Blush: Barry M blusher in BL7
Contour: N.Y.C. bronzer in Sunny

LIPS
Prep: Aquaphor lip ointment
Color: Revlon lipstick in Just Enough Buff

February 14, 2012

Simply Basic Ikat Nail Tutorial

Among being sick this week I was a bit lazy on doing my nails as I decided to reach into my purse and pull out the same red polish which I had used on my nails previously. So, without removing my polish I began to paint over my nails (hence the subtle two toned red appearance below) and create this adorable and pretty basic looking ikat nail design. I actually really love this look and I hope you enjoy it too :)
Click to Enlarge Image
Step 1: Base Coat: Nailtiques Formula 2 (1 coat).

Step 2: Second Coat: 10 Professional Nail Lacquer, in And The Winner Is... /427 (2 coats).

Step 3: Striped Ikat Design: It's So Easy Stripe Rite, in White (you're going to make a rough diamond shape on the nail by keeping the line strokes going vertically, ultimately the lines should touch together as you continue making the uneven lengthened lines, see my guidelines below for additional help).
Click to Enlarge
Step 4: Top Coat: OutTheDoor in Clear (1-2 coats).

February 11, 2012

Red Wing Nails

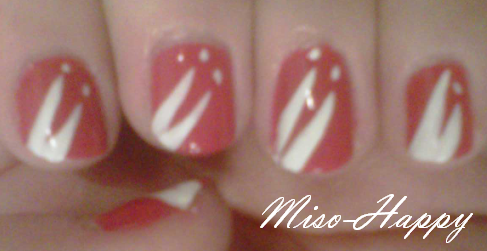
I have no idea why I did this nail design, I guess out of boredom and somehow it makes me think of the Red Wings... so anywhoooo, here's a quick tutorial regardless of what it is :P
It looks more red in person...just fyi
Base Coat: Nailtiques Formula 2 (1 coat)
Second Coat: 10 Professional Nail Lacquer, in And The Winner Is... /427 (2 coats)
Stripes and Dots: It's So Easy Stripe Rite, in White (make the two lines and add the dots at the end)
Top Coat: OutTheDoor in Clear (1-2 coats)

January 22, 2012

DIY Lomography Tutorial

This weekend I attempted giving digital images a lomo makeover using the edit feature in the Windows Live Photo Gallery program. I came up with this tutorial myself so let me know what you think or how this worked out for you.
Before and After
Adjust Detail
Step 1: Reduce noise by clicking analyze and reduce it as much as possible (right), do not sharpen the image (left).
Adjust Color
Step 2: Reduce tint to a low faded resolution as much as possible (left).
Step 3: Raise the color temperature almost all the way up (right).
Step 4: Lower the saturation to where the image starts to look faded and almost gray in color (left).
Adjust Exposure
Step 5: Increase the shadows as much as possible (left).
Step 6: Increase the Highlight slightly but don't completely wash out the image (right).
Step 7: Brightness might increase slightly (right).
Step 8: Contrast might decrease slightly (left).
Save Image and Start Adjusting again...
Adjust Color
Step 9: Slightly increase the color temp (right).
Step 10: Slightly increase saturation (right).
Step 11: Very slightly increase tint (right).
Adjust Exposure
Step 12: Reduce shadows slightly (left).
Step 13: Increase highlights slightly (right).

Note: Keep in mind if your image is not as bright as this one started out then the settings could vary.

September 23, 2011

Gyaru Inspired Eye Makeup

Generally Gyaru style makeup consists of circle contact lenses and over-exaggerated false lashes however, the look I did (below) does not consist of either of those.
Eye Primer: Loreal Decrease
All Over Eye Base Color: Revlon Skinlights (first shade on left of palette) and Maybelline in Almond Satin (lightest shade) over top.
Lid: MAC in Sharp, apply at the outside of the lid and blend it out going toward the inside of the lid.
Outer V and Crease: MAC in Dark Edge, apply at the outside of the lid and blend it up into the crease going toward the inner eye (cat eye the outer V line to come straight out rather then upward).
Lower Lid: MAC in Dark Edge, you want to follow the top cat eye line but don't connect the two together (you want a small gap between them) and blend out the line going toward the inner eye. You also don't want the eyeshadow near the top of the lid near the water line (you want there to be a slight gap).
Upper Lid Liner: Milani gel liner in Black, line the entire top lashline and drag the liner out past the eye 1-2cm (follow the outside base line you did with your upper cat-eye eyeshadow).
Lower Waterline Liner: Almay pencil in Black, only apply about 1-2cm in the center of the water line (under where the iris is).
Mascara: Covergirl LashBlast in Very Black, apply several coats of mascara on top lashes and 1 small coat on the bottom lashes (keep the outer bottom lashes a bit bolder then the inner ones).
Brows: Prestige brows in Light to Medium (lightest shade).

September 13, 2011

Butterfly Wing Nail Tutorial

I found this awesomely gorgeous butterfly wing mani while surfing the net and realized that this would actually be pretty simple to replicate. So, here's my tutorial...
I believe this might be China Glaze in Strawberry Fields.
Step 1: Paint your nails one vibrant solid color (or you could even using multiple colors), a few coats may be required to cover the nail, and let the polish dry completely (I did this a day in advance so my nails had time to dry and harden).
Step 2: Using a black Sharpie Marker (I find using a Sharpie is the easiest route) create the black wing outline (see image above for additional help) and allow to dry (tip: if you press on the black with your finger and it doesn't smear onto your finger then it's probably dry).
Step 3: Using a nail dotting tool or a toothpick dab on a few dots of white polish at the end of the nail and allow to dry.
Monarch Butterfly
Step 4: Apply a clear top coat, let dry completely and you're done!