Showing posts with label Nail Polish. Show all posts

July 07, 2014

Peachy Polish Dupes

I went into Target the other day and as usual found myself in the beauty isle looking for Essie in Tart Deco (after seeing how pretty it looked online). Then I thought to myself "how unique is this color.. I mean really?" and "jeez, this is $8.59 a bottle.. I wonder if there's a cheaper dupe around here?". In no time at all I came across 3 possible dupe contenders which all cost less than the Essie polish.
From left to right: NYC in Hampton Peach, Sinful Colors in Hazard, Sally Hansen in Peach of Cake, and Essie in Tart Deco.
NYC and Essie were the most similar polish shades to one another except NYC's was a smidge brighter. Sinful's was the darkest of the lot and was more of a pumpkin peach shade in comparison. Sally's was the lightest and more of a pale peach orange shade. I ended up getting NYC as it was such a similar shade of polish to Essie's and it was also the cheapest polish of the lot at $1.72 (that's practically 5 bottles of NYC polish for the cost of 1 bottle of Essie polish). Honestly the NYC polish applied very similar to Essie's, and my nails were fully painted in 2-3 coats. For the low NYC price I ended up buying some more polish and got NYC's matte topcoat.
From left to right: NYC in Hampton Peach, and NYX in Matte Me Crazy.
As a side note... these peach shades don't photograph well on the iPhone5 as this polish has a bit more pink to it than the above photo shows (it's much prettier in person).

April 06, 2014

Dupe it Out

Click to Enlarge

Do you find it odd that paint colors of mint aren't actually the true colors of mint? Paint color mint is generally more of an aqua shade (light blue-green), while actual mint plants are more of an olive shade (green-yellow). That aside I ended up finding I had 2 polish colors I felt were polish dupes in terms of color. Essie in "Mint Candy Apple" applies much thicker than Wet n Wild in "Hush Hush/Ultra-Secret" although it's cheaper in price.

February 14, 2012

Simply Basic Ikat Nail Tutorial

Among being sick this week I was a bit lazy on doing my nails as I decided to reach into my purse and pull out the same red polish which I had used on my nails previously. So, without removing my polish I began to paint over my nails (hence the subtle two toned red appearance below) and create this adorable and pretty basic looking ikat nail design. I actually really love this look and I hope you enjoy it too :)
Click to Enlarge Image
Step 1: Base Coat: Nailtiques Formula 2 (1 coat).

Step 2: Second Coat: 10 Professional Nail Lacquer, in And The Winner Is... /427 (2 coats).

Step 3: Striped Ikat Design: It's So Easy Stripe Rite, in White (you're going to make a rough diamond shape on the nail by keeping the line strokes going vertically, ultimately the lines should touch together as you continue making the uneven lengthened lines, see my guidelines below for additional help).
Click to Enlarge
Step 4: Top Coat: OutTheDoor in Clear (1-2 coats).

February 11, 2012

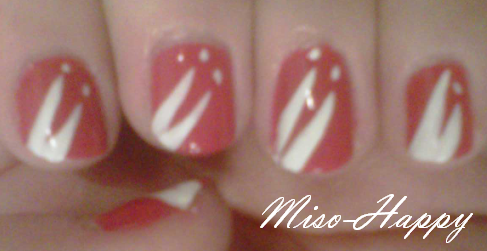
Red Wing Nails

I have no idea why I did this nail design, I guess out of boredom and somehow it makes me think of the Red Wings... so anywhoooo, here's a quick tutorial regardless of what it is :P
It looks more red in person...just fyi
Base Coat: Nailtiques Formula 2 (1 coat)
Second Coat: 10 Professional Nail Lacquer, in And The Winner Is... /427 (2 coats)
Stripes and Dots: It's So Easy Stripe Rite, in White (make the two lines and add the dots at the end)
Top Coat: OutTheDoor in Clear (1-2 coats)

January 28, 2012

Nude Zebra Nails

Lately I have turned to looks and such that are on the neutral and subtly bold side. Thus, I created this animal print color combination (probably nothing new really, heh) which took several different attempts as to which polishes worked best with the Konad stamper.
Base Color: 10 Professional Nail Lacquer in Moonlight (2-3 Coats)
Konad Zebra Print Nail Stamp: Sally Hansen in Blackout
Top Coat: OutTheDoor in Clear (1 Coat)

January 24, 2012

Teen Vogue Cutout Inspo

For some reason an issue of Teen Vogue arrived at my house recently... so after browsing through the images I cutout the items that perhaps appealed to me the most.
Click Image to Enlarge
Various shades of nail polish...from a chunky orange glitter to funky crackle colors, and shades of nude to bright blue. Robin Egg colored clothing and jewelry, to orange sunglasses and makeup. White lace mixed with orange-red's. Pin-Up Pumps and Snakeskin Booties. Susie Bubbles must have perfume followed by her white camera addictions. Kate Moss's puffy hair-do to twisted braids.

December 13, 2011

Milani Polish in Gems

I recently purchased the Milani polish in Gems (530) as it seems to be a trending type of polish this fall. Gems is a clear based chunky glitter with multi colors consisting of gold, silver, fuchsia, green, blue, red, and orange. It has small and big chunky hexagon shaped glitters that are all multi colored in the same fashion. Upon application I found this is best applied in a glopping type of method rather than doing brush strokes in order to get even glitter coverage on the nail, so in that aspect this polish can be one you perhaps love or hate. I always find removing chunky glitter polish to be a bigger headache than application ;D However, I think this is a really cute, fun, and festive polish... nice for Christmas, New Years Eve and even Birthday celebrations.
Milani in Gems polish swatch

August 18, 2011

Fly Electric Nail Tutorial

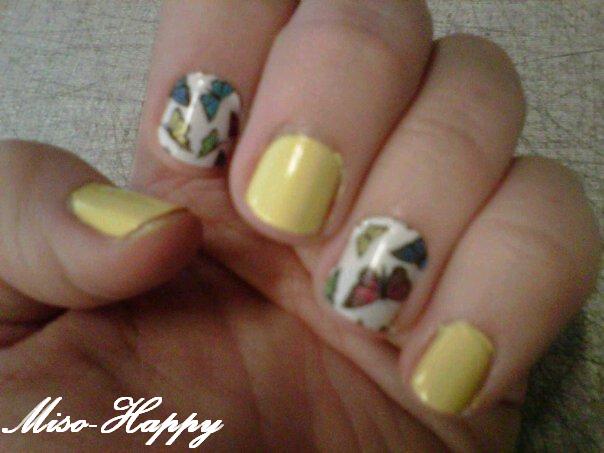
This week I got around to trying out the Sally Hansen Polish Strips (in Fly With Me) they were pretty simple to do. A lot of people complain there are only 16 nail decals but...I found that if your nails are short enough (like mine) that you can cut the decal in half and create 2 (nice right?!).
Revlon Top Speed in Electric and Sally Hansen Polish Strips in Fly With Me
Instead of using the nail file that comes with the decals I used my cuticle cuter to trim off any excess around the nail after application first, then used my nail file to gently file downward to fix any pointy edges. I did a clear base coat on my nails prior to application (used Nailtiques Nail Protein Formula 2). The polish I used here is Revlon Top Speed in Electric which is a banana yellow color with some very fine (I think its kinda silver) shimmer in it, took me 3 coats. Topcoat used over Electric was Out The Door.

BTW the decals claim to last up to 10 days but I'm a bit skeptical since they already have a bit of damage after a day now. Also, I'm not sure how well a clear top coat would work over these either.

June 19, 2011

Designing Polish

I had purchased some empty nail polish bottles a few weeks back online (about $1.13 per bottle with shipping) and decided I wanted to create my own polish shades using the ton of polishes I currently own. So, here are the colors I made and what polishes I used to make them.
-Pale Mint-
China Glaze: White on White
China Glaze: Paper Chasing
Essie: Turquoise and Caicos
Sally Hansen: Peachy Keen
OPI: What's with the Cattitude?
-------------------------------------
-Lilac-
China Glaze: White on White
10: Prima Ballerina
Milani: Cool Vibe
Essie: Looking for Love
Orly: Basket Case
-------------------------------------
-Barbie Pink-
China Glaze: White on White
China Glaze: Flip Flop Fantasy
China Glaze: B-Girlz
Orly: Basket Case
-------------------------------------
-Peach-
China Glaze: White on White
China Glaze: Flip Flop Fantasy
China Glaze: Style Wars
China Glaze: Breakin'
Wet N Wild: Ultra-Secret
Essie: Bright Tights
-------------------------------------
-Cheetah Gold-
China Glaze: White on White
China Glaze: Peach on Earth
Sally Hansen: Lightening
Loreal: Tres Soleil
Milani: Gold Lame
Milani: Morning Sunshine
-------------------------------------
I love how the colors turned out, my favorite is probably the Barbie Pink shade ;D I think I might deco the polish bottles later (ie. Sharpie Markers, Stickers, Glitter...or whatever). And yes...I did use up all my China Glaze "White on White" creating these X.X

May 23, 2011

MAC Quite Cute Dupes

I recently hunted for a MAC Quite Cute Quad dupe and ta-da!
Revlon ColorStay 12 Hour Eye Shadow, Wildflower 370

Cheap makeup FTW again! Save yourself a good $29 ;D BTW a lot of people are disappointed on this MAC quad because the shades are sooo light, C- on the reviews for it. However, I'm not sure the second shade on the Revlon palette is a dupe for the pink shade.

As for possible MAC QC nailpolish dupes...
MAC in Mischievous Mint
MAC in Ice Cream Cake
MAC in Litte Girl Type
Click to Enlarge Swatch Chart
I decided it's time to create a real color chart for all the dupers out there so that we can finally stomp out all the rumors of what dupes and what doesn't, decide for yourself from these actual swatches :) enjoy!

January 10, 2011

Nail Designs for Spring 2011

Here's a collage I put together of the nail design trends going around for this spring.
Half moon designs fell a bit short last year but seem to be making a strong comeback all the way till fall this year. Using a bold color or pattern to jazz up the classic nude french mani makes it look spring time fresh. A little less deco on the nails this year makes for a typing friendly mani, try jazzing up the lack of deco bling though with a glitter topcoat. Geometric designs and patterns are also making a funky 70's hit this year. Light irredescent polish washes over a dark nail color can make your old polish seem new again for 2011. Foiled nails were a fun hit last year and are still fun and inventive this year.

As for popular colors you'll find naked nudes, pale blues, peachy-pinks, lavenders and gray toned metallics. Popular topcoats this year are crackles, pearly polish washes and holographic or gilded shimmer polishes.

September 25, 2010

Blue Leopard Nail Dupe *Redo*

I found this lovely sparkly multi-toned leopard print nail design while browsing the net and fell in love! I'm not sure what was used to acheive this look but I decided to take my hand in replicating it, so here goes...
How To...

Step 1 - Apply a clear polish base coat (I used Barielle Nail Hardener), let dry.

Step 2 - Apply 1 coat of Sally Hansen Xtreme Wear in Blue Me Away!, let dry.

Step 3 - Apply 2 coats of Sally Hansen HD polish in DVD, let dry between coats.

Step 4 - Using a black Sharpie marker create the leopard print pattern as big or small of a pattern as you like, then add the dot pattern and allow ink to dry.

Step 5 - Apply 2 coats of Confetti polish in Tiara, let dry.

Step 6 - Apply a clear top coat polish (I used Seche Vite) and let dry completely.

September 24, 2010

Fall 2010 Colors, Nail Polish Matches and Fashion *Updated*

-Endive, a crisp yellow-green hue. Konad in neon yellow R25, BYS in Anyone for Tennis, Skin Food in Milk Creamy Nail, China Glaze in Celtic Sun or Rimmel London in Lemon Drop.

-Golden Glow, a radiant yellow hue. Sally Hansen in Golden Child, Sinful Colors in Let's Meet, NARS in Cha Cha Cha (limited edition), China Glaze in Breakin', China Glaze in Golden Opportunity, China Glaze in Sun Worshiper or Rimmel London in Sunshine.

-Living Coral, an inviting orange-pink hue. Borghese in Tangelo Sherbert, Paul and Joe in Marrakesh or Essie in Haute as Hello.

-Lipstick Red, a deep red hue. Revlon in Cherries in the Snow, Jessie's Girl in Cherry or Forever 21 in Classic Cherry Red.

-Purple Orchid, an exotic fuchsia hue. Models Own in Purple Poppy, Sally Hansen in Cyber or Essie in Bermuda Shorts.

-Chocolate Truffle, a rich plum brown hue. Revlon in Devilish, Borghese in Espresso Brown, Maybelline in Mocha Blast, CQ in Chocolate Plum, Petites in Plum Royale, Deborah Lippmann in Dark Side Of The Moon or Sally Hansen Complete Salon Manicure in Haute Chocolate.

-Lagoon, a tropical turquoise hue. Ciaté in Ditch The Heels, China Glaze in Flyin' High, Petites Color Fever in Figi, Rimmel London in Green with Envy or Sally Hansen Xtreme in Lagoon.

-Woodbine, a stunning green hue. Wet n Wild in Sage in the City, Maybelline Express in Go Go Green, OPI in Green-Wich Village, Sally Hansen Xtreme in Ivy League or Sally Hansen Complete Salon Manicure in Grass Slipper.

-Oyster Gray, a classic light gray hue. Deborah Lippmann in Waking Up In Vegas, Sally Hansen in Wet Cement or Essie in Playa del Platinum.

-Rose Dust, a romantic beige hue. Butter London in Tea With The Queen, Borghese in Via Veneto Chrome, Petites in Sand Dune or Sally Hansen Insta-Dri in Quick Sand.

Fall 2010 Fashion

SHEERLY BELOVED- light knits perfect for layering.
URBAN DE-GRAY- The perfect polished shade that showed up all over the runways.
GILTY PLEASURES- Gold, bronze and burnished metallics rock!
ANIMAL INSTINCTS- Wild prints and textures look new.
LAYER IT ON- Tunics, wraps, capes, and all manner of clever coverups.
ACCESSORIZE- Long socks, big cowls and lengthy wristers.
CUTTING LOOSE- Oversized is the new shape for comfortable style.
RED HOT!- The key color of the season.
ANCIENT INFLUENCES- New Navajo shapes in updated coloring.
GOING TO NEW LENGTHS- The sleeve stops here, anywhere from cap to three-quarter.

June 14, 2010

Spring/Summer 2011 "Enchanted Picnic" Nail Colors

I recently checked out the color trends for next years Spring/Summer and picked out polish colors I already have on hand to match the Enchanted Picnic color trend for next year! So if you're like me a wanna be a year ahead of the color trend then checkout my picks below ;)

1. Orly: Buried Treasure
2. Barry M: Mint Green
3. Revlon: Steel Her Heart
4. Eyeko: Punk Polish
5. OPI: Pandamonium Pink
6. Milani: Cool Vibe
7. Sally Hansen (Xtreme Wear): Ivy League

May 26, 2010

Avatar Inspired Nail Tutorial

I loved the movie Avatar and thus decided to create my own Avatar inspired nail tutorial. It took much experimenting for me to create this final look, enjoy ;)
Get the Look
-Apply 1 Coat of Clear BaseCoat (I used Barielle Instant Liquid Nail Hardener #1050).
Let Dry 5 Minutes.
-Apply 2 Coats of Sally Hansen Xtreme Wear in "Blue Me Away!" #04.
Let each coat dry 5 Minutes Apart.
-Apply 1 thin coat of Sally Hansen Xtreme Wear in "Disco Ball" #09 (Note: shake/roll polish well as too much glitter can overpower the finished look).
Let Dry 5 Minutes.
-Using the Konad Stamp I used the zebra print on the M57 Konad Plate (I think M73 may be an even better print for this), use Sally Hansen Salon Manicure in "Thinking of Blue" #460. (Note: Avoid shaking/rolling the paint bottle before application, the stamp works better when polish is thick). The polish on your finger can later be removed with polish remover and a Q-Tip.
Let Dry 5 Minutes.
-Apply Dots (as shown in image or you can place them anywhere you like) using Sally Hansen Nail Art Pen in White (Note: Shake Pen before using), I had to go over my dots once I applied them the first time to better enhance them (Note: Don't worry if your dots look a bit caved in, this will practically fix itself in the next step).
Let Dry 5 Minutes.
-Apply 2 Coats of Clear TopCoat (I used Seche Vite Dry Fast Top Coat). Let the first coat dry 5 minutes before applying the 2nd coat.
Let Dry Completely, remove any polish that may have gotten on your skin and your Done.

December 04, 2009

Dot or Not

I've seen this necklace at Forever21 but I noticed a lot of people actually have this one and I managed to save a $1.77 by finding a slightly different one on EBay. WOOT for being different for less, ahah...cheap is the new chic ya know XD
*~*~*~Nail Time~*~*~*
I recently saw Juns mani/pedi (above) and tried my "hand" in replicating it (below) using polish I already owned ^.^ (with dots)
(without dots)

The pink color is Sally Hansen in "Pardon My French", the gold glitter is CoverGirl in "Gold Rush" and I used a base color before adding the CG color which was Milani in "Good Morning Sunshine" which was also used to create the dot work which I did using a toothpick. I ended up happy with my final results except I should've just bought the Sally Hansen Nail Art Pen in Gold cuz my dots look bleh to me.

I'm not sure if its noticeable to most but the pink on the toes appears slightly darker to me then her mani (maybe its the flash, IDK). To me it makes sense to use a darker shade on the toes because the color looks less fleshy from afar since you don't have the dots on 'em. So for the pink on her pedi I opted for my Essie in "Guchi Muchi Puchi" (I totally love saying that name, ahaha).

Mani How-To
Step1: Apply your Clear BaseCoat and let dry.
Step2: You'll need to apply a total of 3 coats of "Pardon My French" (the pink on the 2 fingers) and 2 coats of "Good Morning Sunshine" (the gold on the 3 fingers) and let dry between coats.
Step 3: Apply 5 coats of "Gold Rush" on top of your "Good Morning Sunshine" (let dry between coats) and apply your dots of "Good Morning Sunshine" on top of your "Pardon My French" using a toothpick and let dry.
Step 4: Apply a Clear TopCoat and let dry completely.

Pedi How-To
Step1: Apply your Clear BaseCoat and let dry.
Step2: You'll need to apply a total of 3 coats of "Guchi Muchi Puchi" (the pink on the 2 toes) and 2 coats of "Good Morning Sunshine" (the gold on the 3 toes) and let dry between coats.
Step 3: Apply 5 coats of "Gold Rush" on top of your "Good Morning Sunshine" (let dry between coats) and let dry.
Step 4: Apply a Clear TopCoat and let dry completely.

Well my B-Day is coming up before ya know it, hollaaa...ok please don't. My B-Day always tends to be the worst day of the year for me...I have no clue why its just generally a total cr*p day aside from getting older, I have no expectations at all but I may be celebrating during the weekend...maybe a double B-Day with Mr. Sweety?? IDK.

On a final note I'm leaving ya with this tune, chao fa nao soul sista's and mista's!

September 19, 2009

Jennifers Body

I just watched the movie "Jennifer's Body" starring Megan Fox and I figured since I gave a Megan Fox makeup tutorial before that I'd now do her nails for this movie (as seen below).Basically it's a pink coloured polish on all the nails except the middle fingers are painted black...that's pretty much my tutorial, very simple right?! LOL.

Thanks to Essie I was able to find a possible dupe for this look! Here's my nail color suggestion...
Keep nails short and filed into a rounded shape. Paint all nails in Essie "Swept off my Feet" except for your middle finger which should be painted in Essie "Licorice". Top off nails with Essie "Top Coat" for a glossy finish.

May 19, 2009

China Glaze Haul

Yes, I have the entire 2009 Kicks Collection of China Glaze nail polish...envy much? hah.
Between my Mom and I there were maybe 4 colors out of the 12 neither of use really went for...so that's not bad but I'm sure I'll still get around to using all of them. On that note...I will probably not be buying anymore polish for the rest of the year ;P

I'll probably post a review on these later along with some nail pics of mine using these.