Showing posts with label Maybelline. Show all posts

June 30, 2014

Pam Anderson inspired makeup look

This week I wanted to take it back to this Pamela Anderson inspired makeup look. I don't find this look too different than some makeup looks today aside from the fact she has the thin "porno brows" as I call them (and jeez my brows came out wonky here). Today I find more people are about having fuller brows and you could of course do yours either way you like (I personally think fuller/normal brows look more flattering and youthful as it would make for a softer appearance AKA "girl next door"). I look nothing like Pam but I did like how the look turned out for the most part.

Face Moisturizer: Olay CC cream
Liquid Foundation: Revlon liquid foundation combination/oily, sand beige
Concealer: Maybelline dark spot corrector, fair
Face Powder: Rimmel stay matte pressed powder, creamy natural
Face Contour: Nars bronzer, Laguna 
Eye Primer: Too Faced shadow insurance
EyeShadow Highlight: Rimmel stay matte pressed powder, creamy natural
EyeShadow Upper Crease: Nars bronzer, Laguna 
EyeShadow Outer Crease and Outer Lid: Urban Decay 2 palette, tease
EyeLiner (3/4 outer top lid cat-eye): Rimmel London professional liquid eyeliner, black
Mascara (1 coat on top lashes): Better than Sex Mascara, black
Brows: Prestige brow duo light to medium, medium
Makeup Finishing Spray: Boots No 7 hydrating mineral water spray
Lip Gloss: OCC stained gloss, dune

Things I would fix: Next time I did this look I would probably use some black pencil liner on the outer lower lash-line to make my eyes look more straight across at the bottom. Also, I should have contoured my nose a bit further in to make it slimmer like Pam's. A pencil liner instead of brow powder would have helped make my brows thinner like hers. Some nude lip liner would have helped define my lips a little more as well.

June 01, 2014

Sleeping Beauty Inspired Makeup Look

This week I'm going to see Maleficent and I wanted to try and recreate Aurora's AKA Sleeping Beauty's makeup look. I know the blush in my photo looks less intense than the image but that's only because of the iphone and instagram filters I used, it was actually a pretty good match. If anything I didn't feel my foundation colors were a good match as it needed to be lighter with more pink undertones, but the filter helped a bit. I would also use a bit of shimmer powder on the T-Zone next time I did this look as well. I did feel several of the products I used were a bit optional really, hence saving you some cash ;)
Maleficent (movie)
Products Used...
Face Moisturizer: Ponds rejuveness
Foundation: Revlon colorstay liquid foundation dry/normal in Ivory
Concealer: Maybelline instant age rewind erase dark spot corrector + treatment in Fair
Powder: Rimmel matte pressed powder in Creamy Natural
Blush: Barry M blusher in Apricot
Eye Primer (optional): NYX eyeshadow base in Nude
Contour (face and lids): e.l.f. studio blush and bronzing powder (bronze shade only)
Eyeshadow Highlight (optional): Urban Decay naked 2 eyeshadow palette in Foxy
Brows: Prestige brow perfection in Medium
Top Lashes (one coat, but optional): NYC big bold mascara in Black
Lips: Maybelline lipstick in Magnificent Mauve
Lip Gloss (optional): Almay lip balm in Rosy Lipped
iPhone filter used was "Faded" +
Instagram filter used was "Walden"

March 28, 2014

Glowing Complexion

Glowing Complexion
I had changed my previous foundation routine a bit this past week and honestly a few people have remarked how "glowing" or "fresh" my face now looks (excuse the bad hair day and rubbed off lip color). So if you'd like to know how to get my glowing complexion then here's how I do it!

The first makeup item I switched out was my concealer and how I was applying it. I'm now using Maybelline Instant Age Rewind Erase Dark Spot Corrector + Treatment in Fair over top my all over liquid foundation, and I use this on the areas of my face I wish to highlight (bridge of nose up to the forehead, cupids bow, chin, and under-eye area). This product alone is the main one that has changed and is probably the most responsible for my glowing complexion now. I use the Sonia Kashuk Blending Sponge to blot-blend this in.

I also use Physicians Formula Shimmer Strips, Warm Nude Eyes as before (the top two shades only in white and champagne). I use this to add a subtle shimmery highlight after I use my pressed powder (apply shimmer down the bridge of the nose, along check bones, and a little excess on the forehead).

As for eye-shadow you can actually use the same Physicians Formula palette as mentioned previously, otherwise I have been using the Urban Decay Naked 2 Palette shades in BootyCall (under-brow highlight) and Half Baked (over eyelids and blended up toward the brow).

For an all-over dewy complexion, spritz on a bit of facial mist like Innis Free Green Tea Mineral Mist on top of the finished makeup look.

A few other items I used (outside of the link to my previous makeup routine)...
Almay Color + Liquid Lip Balm, Rosy Lipped
Banana Boat Sunless Summer Color Self Tanning Lotion, Deep Dark
Maybelline Fit Me Shine-Free Foundation, Buff Beige
NYC High Definition Liquid Eyeliner, Soft Black

December 05, 2012

New Lipsticks and Review

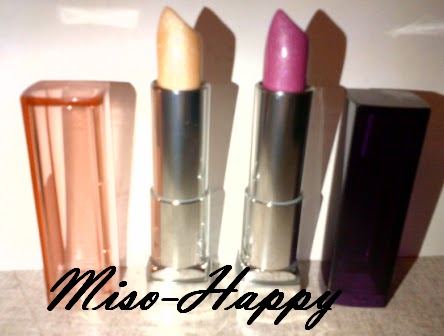
I haven't been buying any new makeup lately which is why you've probably seen a lack of makeup posts on here. I just have too much makeup as it is right now, and with school, work, etc... I have little time to do any new looks. However, I did just buy two Maybelline ColorSensational lipsticks ($7.19 per lipstick at Rite Aid) one is Magnificent Mauve #430 which I believe is a new shade in this collection and the other is Sparkling Sand #740.
Wearing Maybelline's 'Magnificent Mauve' Lipstick
Today at work I decided to try out Magnificent Mauve and a lot of my male co-workers were like "ohhh... nice lipstick, what's the occasion" so, positive reactions to the shade as I usually just wear more natural colors. I do really like this color, it's probably my favorite shade of Mauve right now. My past fave shade of Mauve was Maybelline's lipstick in Sassy Mauve although darker and I usually ended up having to blot it down a bit to suite my pale complexion, but Magnificent Mauve is close to perfect for me as it's mostly pink with a bit of blue undertone to it making it a smidge purple although not really what I'd I'd call a fuchsia (because fuchsia shades look yuckster on me, hah). It also has some very fine silver-ish shimmer to it which gives it a bit of shine, and also the ColorSensational lipsticks are a bit sheer so they'll probably look a bit different on everyone, and also my lips are not really pigmented in color naturally (if that helps).
Left to Right: Sparkling Sand, and Magnificent Mauve
Sparkling Sand really doesn't look like much on myself, it just adds a shiny sheen to my lips and is a nude pale shade with fine shimmers, very sheer on the lips.

October 08, 2012

Liquid Foundation Comparison

I have been wanting to post a comparison of these two liquid foundations for some time now, so finally... here it is! Maybelline SuperStay 24Hr Makeup VS. Revlon ColorStay Makeup.
Not Actual Size
Maybelline SuperStay 24Hr Makeup
Price: $10.99
Size: 30ml
Claims: 24hr Staying Power, Oil-Free
Formula: Micro-Flex
SPF: None
This liquid foundation in comparison to Revlon's is much thicker and dries truer to the bottles color. Since it is thicker it does seem to give better coverage than Revlon's formula although it's not as long lasting. This doesn't contain an SPF so it won't help protect against UV rays like Revlon's however, it also means you won't be getting that SPF white cast on your face which makes this product more ideal for flash photography. This is an oil-free formula unlike Revlon's (which didn't state that it was oil-free or not) so it's possibly more optimal for acne prone skin although, I didn't breakout with either product. I don't find the staying power nearly as good as Revlon's but I did feel this product does start off looking better, dries a bit quicker on the skin and blends better which cuts down on harsh makeup lines. This product is probably better suited for drier skin types since it does turn a bit oily looking on the face after a few hours.

Revlon ColorStay Makeup
Price: $12.99
Size: 30ml
Claims: 24hr Staying Power
Formula: Soft-Flex
SPF: Yes
This liquid foundation in comparison to Maybelline's is much more runny and it seems to dry slightly darker then when it's wet thus drying time takes a bit longer than Maybelline's. Due to it being runny this doesn't seem to give you as great of coverage as with Maybelline's thicker formula although the formula seems to last longer over time (a little goes a long way!) because of its consistency, making the product worth the extra money. This product does contain a small amount of SPF unlike Maybelline's however, this SPF does give you a white cast/glow that SPF tends to do so, this foundation won't be flash photograph friendly when worn by itself (although I always set my liquid foundation with a face powder which does help to cut down on the SPF glare and gives you more of a natural dewey/glow finish). Unlike Maybelline's foundation this brand comes in two different formulas... one for normal/dry skin and the other for combination/oily skin and I would've thought the products consistency may have changed between the two but they seemed the same to me so... I'm not sure the difference. I also didn't find this foundation to really blend into the skin so you do want to try to get the best shade for your skin tone to avoid creating harsh makeup lines. This product also does seem to have decent staying power compared to Maybelline's (Revlon is much more workout/sweat friendly!).

July 22, 2012

Infinite Spoiled Brat Makeup

Eyes
Prime Lids: NYX eye-base in White
Brow Bone & Lower Lid: Wet N Wild eyeshadow in Brulee
Highlight: NYX eyeshadow in White
Lid & Cat-Eye: Wet N Wild's 'Spoiled Brat' palette in Eyelid (shimmery silver color)
Top Lid Liner: Milani liquid eyeliner in Infinite
Top Lashes: Maybelline MegaPlush mascara in Very Black (Apply 3 quick coats)

*Use a strip of 1-in masking tape along the outside of your eye to help make a clean and sharp cat-eye line, then remove the tape gently once you've applied your eyeshadow.

Face
Moisturizer: Olay touch of foundation
Liquid Foundation:
Maybelline 24hr stay in Sand Beige
Powder: Revlon pressed powder in Light

Lips
Prep: Aquaphor Lip Ointment
Lip Gloss: Revlon lip gloss in Peach Petal
Lipstick: A dab of CoverGirl lipstick in Sultry

Brows
Define: Wet N Wild brow pencil in Taupe
Fill: Prestige brow perfection in light to medium in Medium

Contour, Blush, and Highlight

Contour: Milani multitasking face powder in Tan
Blush: Barry M blusher in Strawberry Whip
Highlight: CoverGirl blush in Shimmering Sands

June 27, 2012

June's Beauty Buys

I have bought quite a few new products recently and I just wanted to share some of my favorites this month so, if you like this type of post I'll try to do them every month or so :)
China Glaze polish in Yellow Polka Dot Bikini, I know this isn't a new item but I got this as a dupe for the Sinful Polish in Neon Green because I honestly hate the formula of the Sinful polish as it took 7 coats to accomplish what the China Glaze polish could do in 2-3 coats and thus it was a much better formula. These are very similar colors to one another and I would consider them a close dupe. I've been favoring this shade lately since seeing a very similar shade on the Ring My Bell blog which was my reason for getting this polish.

I have been seeing sooo many people wearing red lipsticks lately that I ended up finding one with a pink undertone to it and it was a new product by Wet N Wild called Red Velvet. The formula is really nice, it has a matte finish and these lipsticks are sooo pigmented and totally worth the purchase (I did grab a few other shades, heh). I also line my lips before applying this using my Apple colored Nabi lip pencil.

Another polish that I got complimented on numerous times from complete strangers and family is Sally Hansen's magnetic polish in Electric Emerald however, I'm sure you'd get just as many comments on it from any of there magnetic polish shades. So while sporting this be prepared to tell people how the polish works, heh.

Also Maybelline has some super cute Porcelain Limited Edition lipsticks out right now and OMG if you like pastel shades then you'll be grabbing them up in a heart beat like I did, haha. I ended up buying Porcelain Pink and Pink Fuschia (although Porcelain Pink looks better on my skin tone). I have a feeling these could be dupes for some of the Barry M lipsticks I have but I haven't done a comparison yet. The only downfall for me is that these taste horrible but I guess you could add some fruity lip gloss over top to mask the taste :P

I also picked up a new liquid eye liner which is the Milani eyeliner Eye Tech Extreme. It is pretty good stuff as it doesn't flake, it's long lasting with staying power, and it isn't that hard to apply since it is a felt tip liner. I found out about this liner from another beauty blogger but I can't remember her blog, fail. The only downfall for me is that I feel with felt tip liners when you're putting it on over top eyeshadow the felt tip doesn't seem to flow that well after a few times of use so I think I'm still preferring my normal Rimmel pro liquid eyeliner since it's a brush applicator.

The last product I'll post about here is Milani's multitasker face powder which I got in the color Tan. Obviously the tan shade is wayyy dark for me to put all over my face but I've been using this as a contour/bronzer and an eyeshadow. The product is super pretty looking in the packaging, the powder is soft to the touch and applys evenly while being a bit blendable. I do recommend giving it a try if you're looking for a matte type of product like this because it does stay on nicely so, I may try another shade which I can use all over my face later on.

March 13, 2012

Maybelline Mineral Power Loose Powder - Quick Review

After realizing I had bought Maybelline's Mineral Power Loose Powder in not only there Translucent shade but also in Ivory and now having used both products recently I decided to give my opinion of the product.
First off, I have dry skin that tends to get a bit shiny throughout the day without the proper makeup powder to set my look, this powder did close to nothing for me. I found the Translucent shade a bit odd because as it has a white-pink color to it, it does not appear to look that way once applied (hence it looked a bit translucent on as intended). The other odd thing I found about this shade is that it didn't seem to work as well as the Ivory shade did for me... so, it might be that way with the other non-translucent shades in this. However, both shades did not seem to do anything for me after about an hour or two after application... it left my face looking shiny as though I had never applied it at all.

This loose powder was definitely not what I was hoping for so I'm not going to recommend it to people... unless you like having little to no coverage and don't need to set your liquid foundation or moisturizer. Even the stubby applicator brush got tossed aside when I got this as I replaced it by using my own foundation makeup brush. I didn't think that this powder had made me look cake-y until I had used the wrong makeup brush one day and my mom basically said "your face looks cake-y today", LOL (no sh*t! haha).

February 07, 2012

Makeup MatchUp

Upon purchasing a new liquid foundation this week since I had ran out of my fave stuff (Maybelline 24hr Stay in Sand Beige) and the store hadn’t stocked up on any I ended up purchasing CoverGirl, TruBlend Liquid Makeup, in Warm Beige 4/445. The foundation definitely wasn’t a dupe for my fave stuff as it was a bit brighter/lighter and more on the pink side. Thus, I decided to make the best of it and experiment with colors that I felt went best with this CG foundation color. Sooo… if you’re perhaps a warm beige skin tone or use this same foundation shade then maybe these other makeup items I picked out will work for you to re-create the below look (sorry it looks overly pink, cell cam and lighting were a bit yuckster).
Click to Enlarge
Foundation

-CoverGirl, TruBlend Liquid Makeup, in Warm Beige 4/445
-Maybelline, Mineral Power Natural Prefecting Finishing Veil Translucent Loose Powder

Lips

-Wet n Wild, Megalast Lip Color, in Pink Suga’ 900b
-Neutrogena, Moisture Shine Lip Gloss, in Fruity Pink

Brows

-Wet n Wild, Color Icon Eye Shadow Palette, in Vanity (2nd row, left column)
-Boots no7, Lash and Brow Perfector, in Clear

Blush & Contour

-Barry M, Blusher, in Strawberry Whip/BL8
-Neutrogena, Healthy Skin Blends Natural Radiance Bronzer, in Sunkissed 30

Eye Shadow

-L.A. Colors, Mineral EyeShadow, in Beige/BME489
-Wet n Wild, Color Icon Eye Shadow Palette, in Vanity (3rd row, right column)

Mascara

-Rimmel, Glam Eyes (Non-Waterproof) Mascara, in Extreme Black
-CoverGirl, LashBlast Volume Blasting (Non-Waterproof) Mascara, in Very Black

Overall I thought this look came out nice, feminine, and natural (better looking in person I think) since the colors seem to work harmoniously together (art history class may be paying off after all, LOL).

November 06, 2011

Maybelline Baby Lips - Review

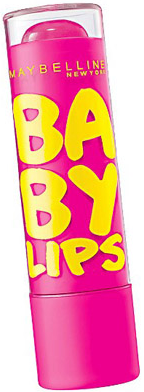
I had watched a YouTube review (can't remember who it was) on Maybelline Baby Lips and decided to purchase the recommended shade/flavor called Pink Punch.

It's a cute shade for spring although I'm not sure the color is uber flattering on myself (probably looks best with some pink blush on the cheeks). I do find it moisturizing (lasting well over an hour but not 8 hours as advertised) and it is nice that it has SPF 20. For a chapstick type of product it does have nice pigmentation in the colored ones, especially for being a bit sheer. The scent is of fruit punch although a bit artificial smelling, I can detect some citrus and berry notes in it. The packaging for Pink Punch is pretty cute with its bubble gum pink and yellow lipstick dispenser, very youthful and girly :P I probably wouldn't buy this shade again, perhaps one of the clear shades I might though and then just wear regular gloss/lipstick over top.

October 30, 2011

MAC Dupes

This weekend I decided to try and find a few MAC dupes using eyeshadows I currently own, enjoy ;)

MAC Next to Nothing - Maybelline Quad in Designer Chocolates (Lid shade)
The Maybelline one is slightly more tan/gold while Next to Nothing is a bit more white. I think I actually prefer Maybelline's color although these two shades are very similar and I have "hit pan" on both eyeshadows.
Click to Enlarge
MAC Dark Edge - Revlon Rich Sable
These two shades are very similar although Rich Sable may have slightly more red to it, I do feel this is a nice dupe regardless. Over the two colors... I actually prefer the MAC because I think it applies soft/smooth during application and the Revlon feels a bit dry/chalky in texture and applies a bit more unevenly.
Click to Enlarge
MAC Tempting - Maybelline Urban Brown
Urban brown applies a bit more dark than Tempting, the shade may look drastically more dark in one of the photo's but in person if you applied this on your lids, I really don't think you'd notice much difference between the two. Tempting does appear to have more shimmer to it than Urban Brown but once swatched I couldn't really notice a difference in shimmer. I think Urban Brown applies slightly better than Tempting as it's more pigmented, and I had to build up Tempting's color a bit to look as intense as Urban Brown. I do feel this is a good dupe if you're wanting to darken Tempting as much as the Urban Brown, but if you want a shade that starts off lighter but can go darker than choose Tempting, although you could probably blend out (or apply less) Urban Brown to appear lighter.
Click to Enlarge

September 23, 2011

Gyaru Inspired Eye Makeup

Generally Gyaru style makeup consists of circle contact lenses and over-exaggerated false lashes however, the look I did (below) does not consist of either of those.
Eye Primer: Loreal Decrease
All Over Eye Base Color: Revlon Skinlights (first shade on left of palette) and Maybelline in Almond Satin (lightest shade) over top.
Lid: MAC in Sharp, apply at the outside of the lid and blend it out going toward the inside of the lid.
Outer V and Crease: MAC in Dark Edge, apply at the outside of the lid and blend it up into the crease going toward the inner eye (cat eye the outer V line to come straight out rather then upward).
Lower Lid: MAC in Dark Edge, you want to follow the top cat eye line but don't connect the two together (you want a small gap between them) and blend out the line going toward the inner eye. You also don't want the eyeshadow near the top of the lid near the water line (you want there to be a slight gap).
Upper Lid Liner: Milani gel liner in Black, line the entire top lashline and drag the liner out past the eye 1-2cm (follow the outside base line you did with your upper cat-eye eyeshadow).
Lower Waterline Liner: Almay pencil in Black, only apply about 1-2cm in the center of the water line (under where the iris is).
Mascara: Covergirl LashBlast in Very Black, apply several coats of mascara on top lashes and 1 small coat on the bottom lashes (keep the outer bottom lashes a bit bolder then the inner ones).
Brows: Prestige brows in Light to Medium (lightest shade).

May 09, 2011

My Top LipStick/Gloss Picks for 2011

I went through all my lippies and decided to pickout a good handful of colors I'd like to wear throughout this year. From shades I want to use more this year, to popular shades, personal favorites and trending shades! Here goes...

Barry M
100
129
130
Maybelline
Pink Sand 005 (ColorSensational)
Coral Crush 515 (ColorSensational)
Bronze Beam 750 (ColorSensational)
Shimmer Shell (Shiny-Licious)
Revlon
Nude Attitude 001 (Revlon Matte)
Gentlemen Prefer Pink 450 (Super Lustrous)
Siren 677 (Super Lustrous)
Peach Petal (Super Lustrous SPF)
Papaya 020 (ColorBurst)
Crystal Cut Coral 700 (Moon Drops)
Wet 'n' Wild
909C (Mega Colors)
901B
Coastal Scents
Pep Pink (Smacks)
Prestige
Madrid CL-40A
CoverGirl
Divine Divine 330
Shiseido
Spiced Cream BE109

July 17, 2010

"On the Scene" Eye Makeup Tutorial

This eye makeup look is by MAC "In the Groove" series and this one is called "On the Scene". Since I really don't like their makeup tuts on how to acheive these looks I've created a similar how-to tutorial on how I think this exact look can be more easily acheived and without using MAC products, enjoy ;)
Step 1: Prime entire eye area using Loreal De-Crease.

Step 2: Line entire upper lashline using Styli-Style Waterproof Liquid Liner pen in Blackest Black.

Step 3: Apply an under brow highlight color in cream (or similar skin tone) colored eyeshadow, I used Maybelline eyeshadow single in Linen.

Step 4: Using Coastal Scents 88 Shimmer Pallete I applied a Medium/Light shade of blue (5 across and 1 down). Apply this to inner top half and blending up past crease of lid and entire lower lash line.

Step 5: Using the Maybelline quad in Hushed Tints I applied the orange shade to the outer top lid insuring to blend the color up toward the brows and also applying it to the middle of the lower lash line.

Step 6: Using the same Maybelline quad in Hushed Tints I applied the dark brown shade to the lower outer top lid lightly just to add some subtle dimension to the eye and also applied it over the middle of the lower lash line of the orange I just applied. I also used this color to fill in my brows.

Step 7: Apply several quick coats of Rimmel Sexy Curves Mascara in Extreme Black to entire top lashes and middle of bottom lashes.

July 15, 2010

Maybelline LipStick Colors

(NO FLASH)
(FLASH)
(FROM LEFT TO RIGHT)
Pink Sand 005, Nude Blush G132, Sweet Ginger G80

October 17, 2009

Mascara Blunders

Some makeup brands make many attempts to re-design their beauty products... unfortunately it doesn't appear they're making any real upgrades to their new designs as the outcome is hideous. My honest opinion is that these funky mascara designs don't work and if you're like me...you'll end up throwing them straight into the trash (unless someone in Makeupalley.com wants it?!) Anyhow, here are some mascaras to NOT waste your money on ;P

Mascara Cons...
Product: L’Oreal Paris Telescopic Explosion
Cons: The brush is so small it makes it unstable and hard to get a continuously even coat/s of mascara applied to your lashes. It definitely doesn't volumize your lashes as they stick together, it goes on a bit gloppy. Although it may make lashes appear longer it's such a messy look with this wand that it really doesn't look good unless you can use a more basic shaped mascara wand.

Product: Revlon DoubleTwist MascaraCons: This space saving gaped design only allows the mascara to fill into the empty spaces inside the wand. Mascara really glops on with this wand, not lash flattering at all and the mascara doesn't seem to be the greatest quality even if you decided to use a better wand.

Product: Maybelline Define-A-Lash Pulse Perfection
Cons: First off for $15 drugstore mascara, I'll pass on the purchase. Secondly if people are sooo lazy that they can't wriggle a mascara wand as we've been doing for so many years already then... yea, 'nuff said. Also I read plenty of mixed reviews that the vibrating wand makes you blink too much as if it'll vibrate right into your eye and I've seen review pics online of this and those tarantula lashes just aren't at all cute.

May 10, 2009

Orange & Blue Makeup Tutorial

This is one of my fave eye shadow color combo's I've been creating this year.

January 14, 2009

2009 Spring Eyes

I got commented on my eyeshadow today, woot! By Mr. Sweety no less ;p I was looking on MSN the other day at the 2009 Spring Makeup looks. I really wanted to get the Gilded duo by Loreal, but CVS was all sold out of course, grrr. So I stuck with the same brand and instead bought a loose powder gold eyeshadow, it's very glitzy-glam on the eyes ^.^ the Gilded colors look like a combination of gold and dark brown but with my black hair I decided the black was more fitting than dark brown. Also peach blush is suppose to be in style which makes since because I've recently seen people using bronzer and blush on their cheeks and peach (the one I bought) is really a combination of both.
--------------------------------------------------------------
How to get this exact look...Step 1: Apply L'Oreal De-Crease Eye Shadow Base in De-Crease 910 to your entire eye area, blend with you finger tip until absorbed.

Step 2: Using L'Oreal HIP Shocking Shadow Pigments in Visionary 924 I used the brush it came with to cover the entire eye lid area.

Step 3: Using Maybelline Expertwear Single Eyeshadow in Night Sky Shimmer Finish 240 I took the Maybelline Expert Tools Angled Definer Brush and did a cat eyed effect only using the black on the outer corner of the eye and the bottom lid.

Step 4: Curl lashes using the Maybelline Expert Tools Eyelash Curler and do two coats of mascara on top and one coat on the bottom using CoverGirl LashBlast Mascara in Very Black 800 (FYI: this is not the waterproof mascara they have).
--------------------------------------------------------------
P.S. Mr. Sweety put me to a cologne smell test last night to see which of his colognes I preferred and ya'll know I know my stuff when it comes to scent. I ended up picking the Versace one...he then said I had classy taste, haha. Classy Lady ;) Some of the other ones he had consisted of Lacoste, Polo and Cool Water but meh...not so great. I'm still waiting to find the guy that wears my fav mens cologne Tommy...where are you?!! haha. My mom says I like that scent because it smells like some of my hair products, go fig, haha. Speaking of hair prod, I bought the Biolage shampoo and conditioner and lately everyone has been sniffin my hair! Smells nice and clean, haha.